INTRODUCTION
Hypoglossal nerve stimulator (HNS) implantation represents a relatively novel treatment for carefully selected patients with moderate to severe obstructive sleep apnea (OSA) from tongue base obstruction, where the patient is intolerant of continuous positive airway pressure. The technique of implantation has been well described since its introduction to the market in 2014.
Beginning in 2015, HNS began with carefully chosen children with Down syndrome. The first group of children underwent placement of the sensor lead through a separate third incision below the nipple. This approach was modified to a two-incision technique in 2017. In 2023, HNS implantation was approved by the U.S. Food and Drug Administration (FDA) for select patients with Down syndrome (DS). The current recommendations for positioning and placement of the shortened sensor lead are based on adult surgical implant techniques. This technique may be difficult in young children with thin muscular planes or in children with obesity and DS, where the planes between muscles or between muscles and adipose tissue may be difficult to appreciate.
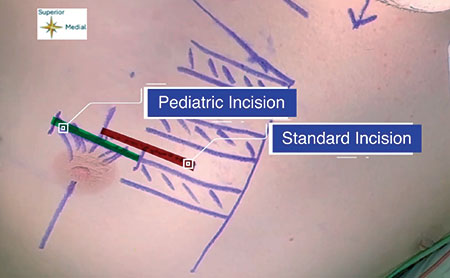
Figure 1: Incision planning. The incision used in this modified technique (green) uses the superior rib margin and the mid-nipple line to base the incision. This is in contrast to previously described standard techniques (red), which base the incision on a distance of 3 cm from the sternum and between two ribs.
This article describes the technique of the senior author to apply lessons learned from pediatric airway reconstruction and costal cartilage grafting (where the boney cartilaginous junction of the rib is routinely identified), coupled with the anatomic knowledge that the junction between the internal and external intercostal muscles, where the sensor lead will be inserted, lie just on the superior aspect of the rib at the boney/cartilaginous junction. These lessons learned from previous pediatric airway techniques and knowledge of the anatomy allow for a revised technique that may be more time efficient, more straightforward to learn and teach, and safer, with potential for improved patient outcomes.
METHODS
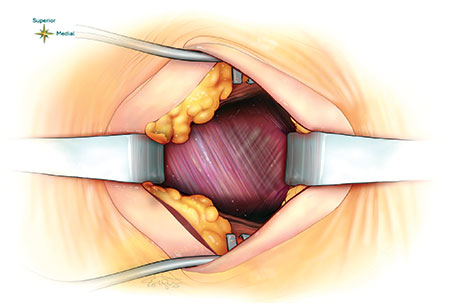
Figure 2: Previously described method of finding the demarcation zone of the internal and external intercostal muscles halfway between the ribs and making a pocket through the external to place the sensing lead between the external and internal muscles.
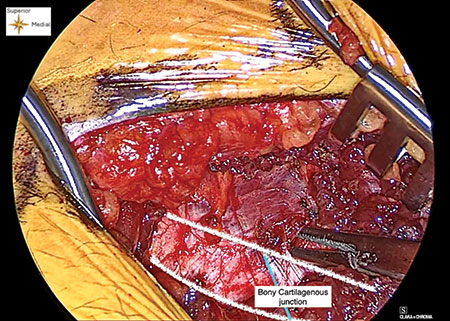
Figure 3: Creating a window. A window or pocket is created with a blunt dissector, and the superior rib surface can be palpated while creating this dissection plane between the external and internal intercostal muscles.
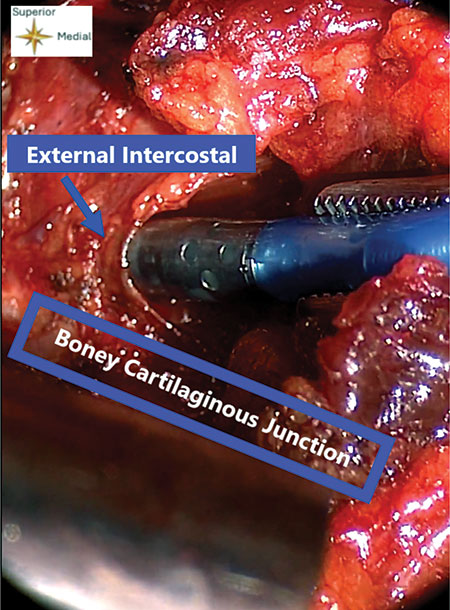
Figure 4: Placement of the sensing lead. The sensing lead is placed into the pocket made by blunt dissection. It is inserted until the entire metal of the sensing lead is buried deep in the external intercostal muscle.
Descriptive photo and video documentation of a revised surgical technique. This study was considered exempt from human studies research by the Mass General Brigham IRB.
The Inspire Medical Systems, Inc. (Maple Grove, Minn., USA) implantation device was used. The incision is planned more lateral to the standard incision as the nipple line as a midline for the incision, which serves as an external landmark for the boney cartilaginous (BC) junction of the rib (Fig. 1). The incision is then made through skin, carried through the subcutaneous fat and pectoralis muscles directly to the anterior rib surface (as opposed to the standard technique, in which the intermuscular plane is identified midway between the ribs by separating the adipose tissue overlying the intercostals and dissecting to find the junctional boundaries, depicted in Fig. 2). Soft tissue can be cleared over the rib, leaving the periosteum and perichondrium intact. Just superior to the BC junction of the rib, where the internal and external intercostal muscle fibers intersect, a pocket is made with a blunt dissector (Fig. 3) between the internal and external intercostal muscles. During this maneuver, the superior aspect of the rib can be continually palpated so as not to dive deep into the pleural space. The sensing lead is implanted close to the junction, using the malleable as a guide, and placed from medial to lateral (Fig. 4) rather than in a fashion that starts from superior to inferior before turning medial to lateral, which feels more likely to injure deeper structures. The remainder of the procedure is carried out in a standard fashion as previously described or as recommended by Inspire.
RESULTS
The change in technique, using reliable anatomy in young children with DS, results in successful and safe implantation and is especially helpful in those who are relatively obese.
Leave a Reply